# 功能权限
# 1. RBAC 权限模型
系统采用 RBAC 权限模型,全称是 Role-Based Access Control 基于角色的访问控制。
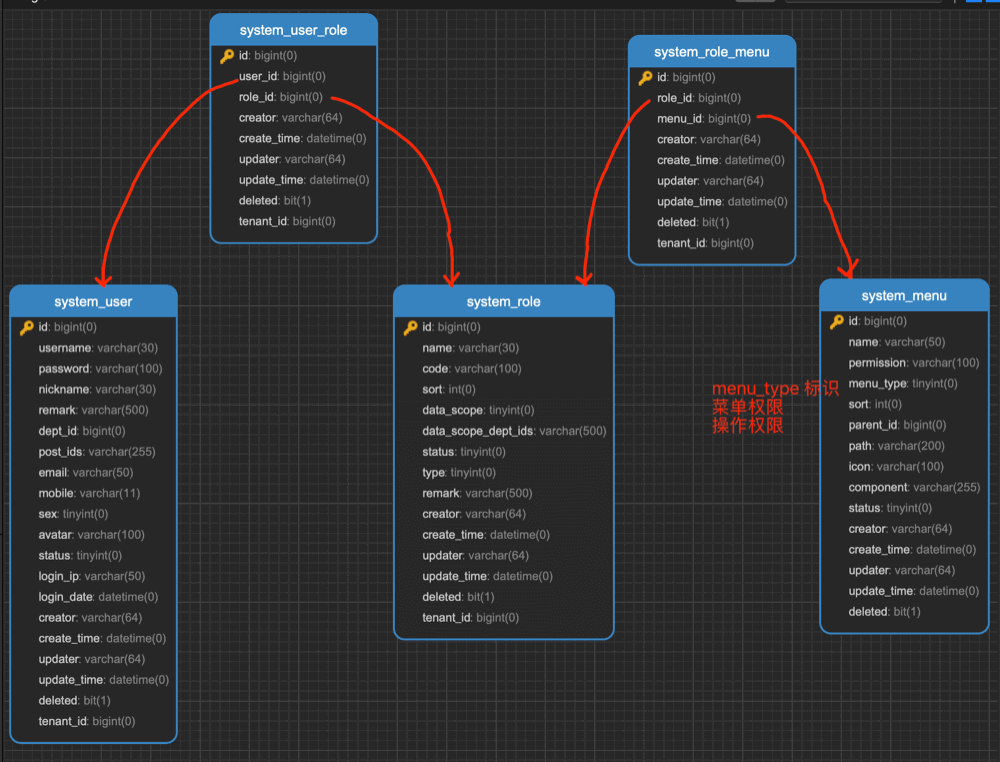
 简单来说,每个用户拥有若干角色,每个角色拥有若干个菜单,菜单中存在菜单权限、按钮权限。这样,就形成了 “用户<->角色<->菜单” 的授权模型。 在这种模型中,用户与角色、角色与菜单之间构成了多对多的关系,如下图:
# 2. Token 认证机制
安全框架使用的是 Spring Security (opens new window) + Token 方案,整体流程如下图所示:
 ① 前端调用登录接口,使用账号密码获得到认证 Token。响应示例如下:
{
  "code":0,
  "msg":"",
  "data":{
    "token":"d2a3cdbc6c53470db67a582bd115103f"
  }
}
2
3
4
5
6
7
管理后台的登录实现,可见 代码 (opens new window) 用户 App 的登录实现,可见 代码 (opens new window)
疑问:为什么不使用 Spring Security 内置的表单登录? Spring Security 的登录拓展起来不方便,例如说验证码、三方登录等等。
Token 存储在数据库中,对应 system_oauth2_access_token 访问令牌表的 id 字段。考虑到访问的性能,
缓存在 Redis 的 oauth2_access_token:%s (opens new window) 键中。
疑问:为什么不使用 JWT(JSON Web Token)? JWT 是无状态的,无法实现 Token 的作废,例如说用户登出系统、修改密码等等场景。 推荐阅读 《还分不清 Cookie、Session、Token、JWT?》 文章。
默认配置下,Token 有效期为 30 天,可通过 system_oauth2_client 表中 client_id = default 的记录进行自定义:

- 修改
access_token_validity_seconds字段,设置访问令牌的过期时间,默认 1800 秒 = 30 分钟 - 修改
refresh_token_validity_seconds字段,设置刷新令牌的过期时间,默认 2592000 秒 = 30 天 ② 前端调用其它接口,需要在请求头带上 Token 进行访问。请求头格式如下:
### Authorization: Bearer 登录时返回的 Token
Authorization: Bearer d2a3cdbc6c53470db67a582bd115103f
2
- 具体的代码实现,可见 TokenAuthenticationFilter (opens new window) 过滤器 考虑到使用 Postman、Swagger 调试接口方便,提供了 Token 的模拟机制。请求头格式如下:
### Authorization: Bearer test用户编号
Authorization: Bearer test1
2
其中 "test" 可自定义,配置项如下:
### application-local.yaml

yudao:
  security:
    mock-enable: true # 是否开启 Token 的模拟机制
    mock-secret: test # Token 模拟机制的 Token 前缀
2
3
4
5
6
# 3. 权限注解
# 3.1 @PreAuthorize 注解
[@PreAuthorize](opens new window)
是 Spring Security 内置的前置权限注解,添加在接口方法上,声明需要的权限,实现访问权限的控制。
① 基于【权限标识】的权限控制
权限标识,对应 system_menu 表的 permission 字段,推荐格式为 ${系统}:${模块}:${操作},例如说 system:admin:add 标识 system 服务的添加管理员。
使用示例如下:
// 符合 system:user:list 权限要求
@PreAuthorize("@ss.hasPermission('system:user:list')")

// 符合 system:user:add 或 system:user:edit 权限要求即可
@PreAuthorize("@ss.hasAnyPermissions('system:user:add', 'system:user:edit')")
2
3
4
5
② 基于【角色标识】的权限控制
权限标识,对应 system_role 表的 code 字段, 例如说 super_admin 超级管理员、tenant_admin 租户管理员。
使用示例如下:
// 属于 user 角色
@PreAuthorize("@ss.hasRole('user')")

// 属于 user 或者 admin 之一
@PreAuthorize("@ss.hasAnyRoles('user', 'admin')")
2
3
4
5
实现原理是什么? 当 @PreAuthorize 注解里的 Spring EL 表达式返回 false 时,表示没有权限。
而 @PreAuthorize(“@ss.hasPermission('system:user:list')”) 表示调用 Bean名字为 ss 的 #hasPermission(...) 方法,方法参数为 “system:user:list” 字符串。 ss 对应的 Bean 是 PermissionServiceImpl 类,所以你只需要去看该方法的 实现代码 。
# 4. 自定义权限配置
默认配置下,所有接口都需要登录后才能访问,不限于管理后台的 /admin-api/** 所有 API 接口、用户 App 的 /app-api/** 所有 API 接口。
如下想要自定义权限配置,设置定义 API 接口可以匿名(不登录)进行访问,可以通过下面三种方式:
# 4.1 方式一:自定义 AuthorizeRequestsCustomizer 实现
每个 Maven Module 可以实现自定义的 AuthorizeRequestsCustomizer (opens new window) Bean,额外定义每个 Module 的 API 接口的访问规则。
例如说 xcmd-module-infra 模块的 SecurityConfiguration (opens new window) 类,代码如下:
@Configuration(proxyBeanMethods = false, value = "infraSecurityConfiguration")
public class SecurityConfiguration {

    @Value("${spring.boot.admin.context-path:''}")
    private String adminSeverContextPath;

    @Bean("infraAuthorizeRequestsCustomizer")
    public AuthorizeRequestsCustomizer authorizeRequestsCustomizer() {
        return new AuthorizeRequestsCustomizer() {

            @Override
            public void customize(AuthorizeHttpRequestsConfigurer<HttpSecurity>.AuthorizationManagerRequestMatcherRegistry registry) {
                // Swagger 接口文档
                registry.requestMatchers("/v3/api-docs/**").permitAll()
                        .requestMatchers("/swagger-ui.html").permitAll()
                        .requestMatchers("/swagger-ui/**").permitAll()
                        .requestMatchers("/swagger-resources/**").permitAll()
                        .requestMatchers("/webjars/**").permitAll()
                        .requestMatchers("/*/api-docs").permitAll();
                // Spring Boot Actuator 的安全配置
                registry.requestMatchers("/actuator").permitAll()
                        .requestMatchers("/actuator/**").permitAll();
                // Druid 监控
                registry.requestMatchers("/druid/**").permitAll();
                // Spring Boot Admin Server 的安全配置
                registry.requestMatchers(adminSeverContextPath).permitAll()
                        .requestMatchers(adminSeverContextPath + "/**").permitAll();
                // 文件读取
                registry.requestMatchers(buildAdminApi("/infra/file/*/get/**")).permitAll();
            }

        };
    }

}
2
3
4
5
6
7
8
9
10
11
12
13
14
15
16
17
18
19
20
21
22
23
24
25
26
27
28
29
30
31
32
33
34
35
友情提示如果你对 Spring Security 了解不多,可以阅读艿艿写的 《fastjava Spring Boot 安全框架 Spring Security 入门 》
- permitAll() 方法:所有用户可以任意访问,包括带上 Token 访问
- anonymous() 方法:匿名用户可以任意访问,带上 Token 访问会报错
# 4.2 方式二:@PermitAll 注解
在 API 接口上添加 @PermitAll (opens new window) 注解,示例如下:
// FileController.java
@GetMapping("/{configId}/get/{path}")
@PermitAll
public void getFileContent(HttpServletResponse response,
                           @PathVariable("configId") Long configId,
                           @PathVariable("path") String path) throws Exception {
    // ...
}
2
3
4
5
6
7
8
# 4.3 方式三:xcmd.security.permit-all-urls 配置项
在 application.yaml 配置文件,通过 yudao.security.permit-all-urls 配置项设置,示例如下:
yudao:
  security:
    permit-all-urls:
      - /admin-ui/** # /resources/admin-ui 目录下的静态资源
      - /admin-api/xxx/yyy
2
3
4
5